Perfect Application Every Time
Application Guide
Follow these steps for professional results
Step-by-Step Instructions
Prepare Your Workspace
Set up your heat press or iron on a stable, flat surface. Ensure your workspace is well-ventilated.
Pro Tips:
- •Use a heat press for best results
- •If using an iron, avoid steam settings
- •Pre-heat your equipment for consistent temperature
Prepare the Garment
Pre-press the garment for 2 seconds to remove moisture and wrinkles.
Pro Tips:
- •Ensure the fabric is completely dry
- •Remove any lint or debris
- •For new garments, wash first to remove factory coatings
Position the Transfer
Place the transfer face-down on the garment. Use alignment guides if needed.
Pro Tips:
- •Center the design carefully
- •Use a ruler or measuring tape for precision
- •Ensure the transfer is completely flat
Important: Do not move the transfer once heat is applied
Learn how to position transfers here
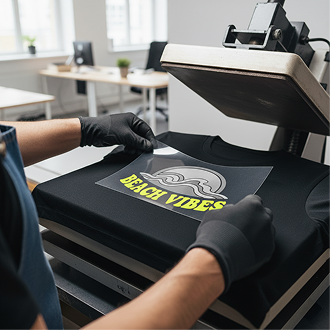
Apply Heat and Pressure
Apply firm, even pressure for 12 - 15 seconds at 290°F - 145°C
Pro Tips:
- •Use steady, consistent pressure
- •Cover entire design area
- •Count the full 15 seconds
Peel the Carrier
While the transfer is still warm, peel the carrier film in one smooth motion.
Pro Tips:
- •Peel immediately while warm
- •Use steady, consistent speed
- •Peel at a 45-degree angle
- •If the transfer begins to lift with the carrier, allow it to cool until it's safe to touch. Finish peeling, then press again for 5 seconds to lock in the transfer
Important: If transfer lifts with carrier, reapply heat and try again
Final Press (Optional)
Apply a final 5-second press with parchment paper for best adhesion.
Pro Tips:
- •Use parchment paper or Teflon sheet
- •Apply light to medium pressure
- •This step improves washability
Care Instructions
Follow these care instructions to maximize the life of your transfers:
Expected Lifespan:
With proper care, InkFlex transfers typically last 50+ wash cycles while maintaining excellent appearance and adhesion.